Text animation is a technique used to add flair and movement to letters, words, sentences, and sometimes whole paragraphs. A creative concept with limitless possibilities, you can move text side to side, up and down, recede from view or move along a specific pattern. In most cases, the movement is coded to a replicating pattern, which replays endlessly. The animated text helps increase interest, engagement, and visual appeal, which is mostly lacking in static texts. In this post, we’ll go over different ways you can use Adobe After Effects to animate text.
Different Ways to Animate Text In After Effects
After Effects is considered the industry-standard program for visual effects and motion graphics. To use it, you will need training and extensive hands-on experience. Some professions that use it include animators, visual designers, video artists, editors and producers, UX professionals, social media professionals, and advertising agencies. This section explains a three ways you can use After Effects to create text animation: the text animator tool, animating via a path, or using presets.
Using the Text Animator Tool
The text animator tool gives you total control over all the possible features, and you only have to use your imagination to add flair to your animations.
Open the text layer options > Animate, and a drop-down menu of text animators will appear based on the text properties, which you can use to change the internal features of properties.
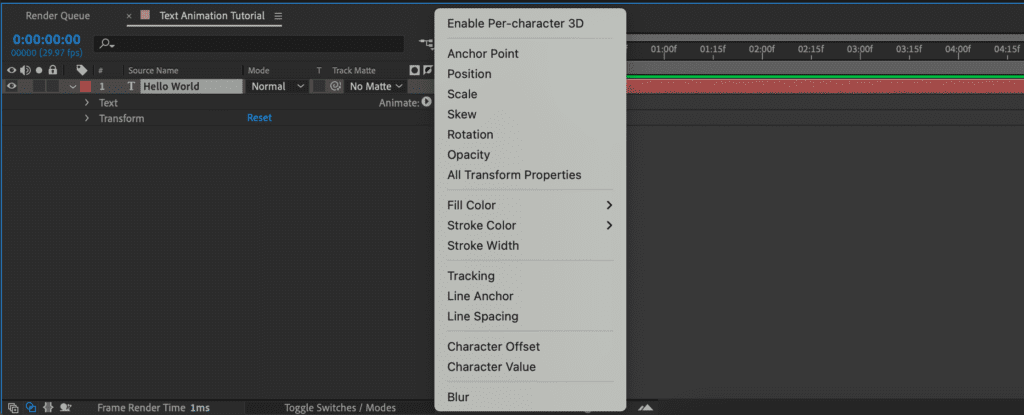
There are numerous text animators to choose from, including:
- Tracking – Animating the letter spacing in selected letters.
- Opacity – Ranges from 0 to 100% and is the transparency of a layer or object.
- Type on – Replicates someone typing on a screen.
- Blur – Lets you control how much Gaussian blur to add to a character. You can explicitly define the horizontal and vertical blur amounts.
- Skew – This means that the object or text is neither parallel nor at a right angle based on an implied line.
- Rotation – A function to rotate objects and ranges from 0 to 360 degrees.
- Anchor point – The center of all manipulations and is mapped on the adjustable x and y-axis.
- Position – This feature lets you point precisely where you want to layer the x and y-axis.
- Scale – Designed to keep the original ratio of your layer. It is measured by x and y values, representing the width and height.
- Stroke width – Allows you to adjust the width of the stroke you have applied to the text layer.
- Line anchor – Indicates the alignment racking for each line of text.
- All transform properties – Used when you need to create an effect using multiple text animator properties. So, you can select all transform properties instead of applying each property.
Creating Animated Text Using a Path
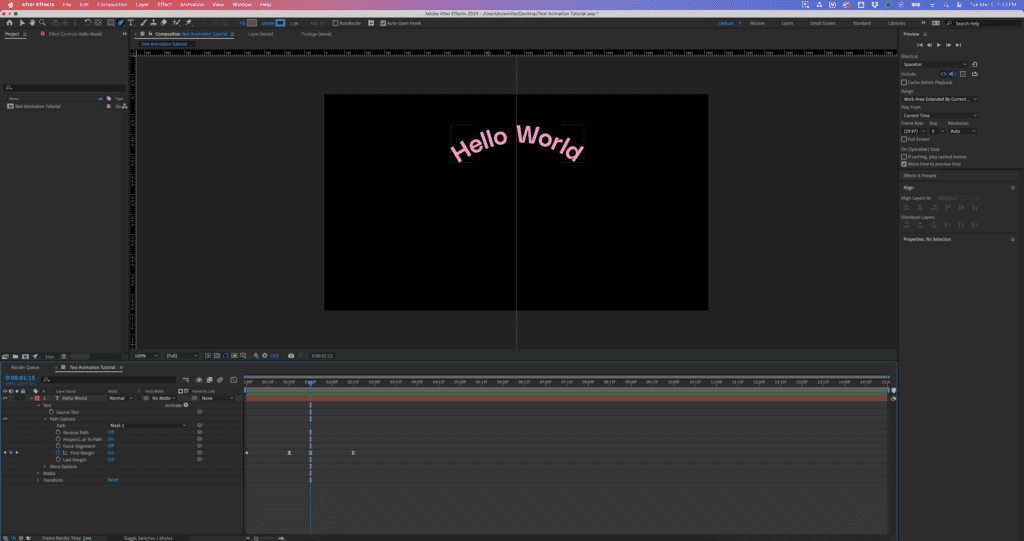
Path animation is a little more limited compared to other methods. It, however, still has its uses. The techniques involve consolidating multiple elements, which often seem unrelated. It is, however, easy to create animated text on a path once you understand how the various elements complement each other. What is more, this is a creative way of adding an element of fun into your design. There are numerous unique possibilities when animating along the Path. Here is how to go about it.
1. Select a layer
Choose a layer that your text will be added on.
2. Create the Path
Make the path that the text will move along. You can use a shape tool or a pen tool for this.
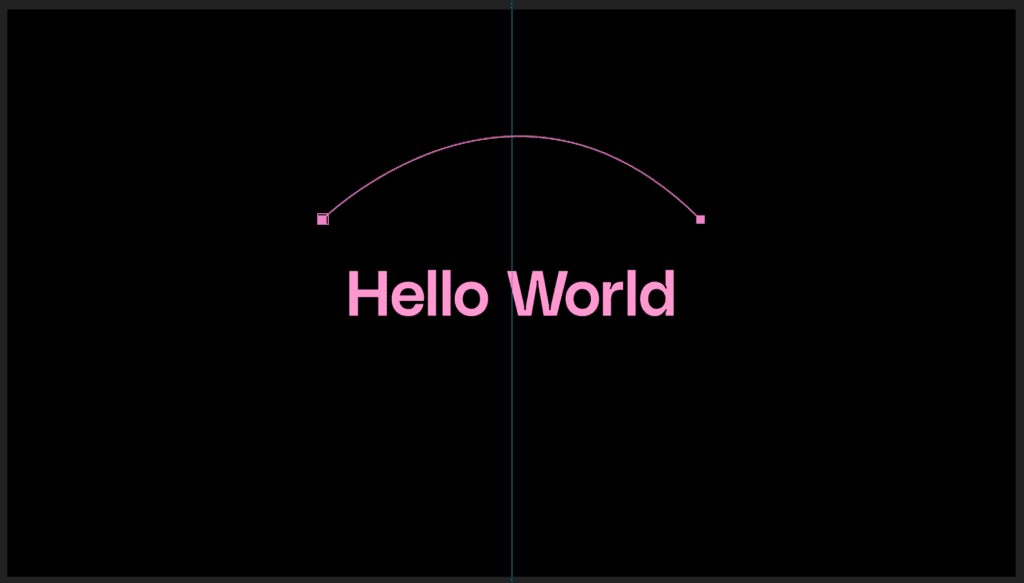
3. Change Path to Mask
Click the Text menu and select Path options. Then change Path to the Mask that you just drew.
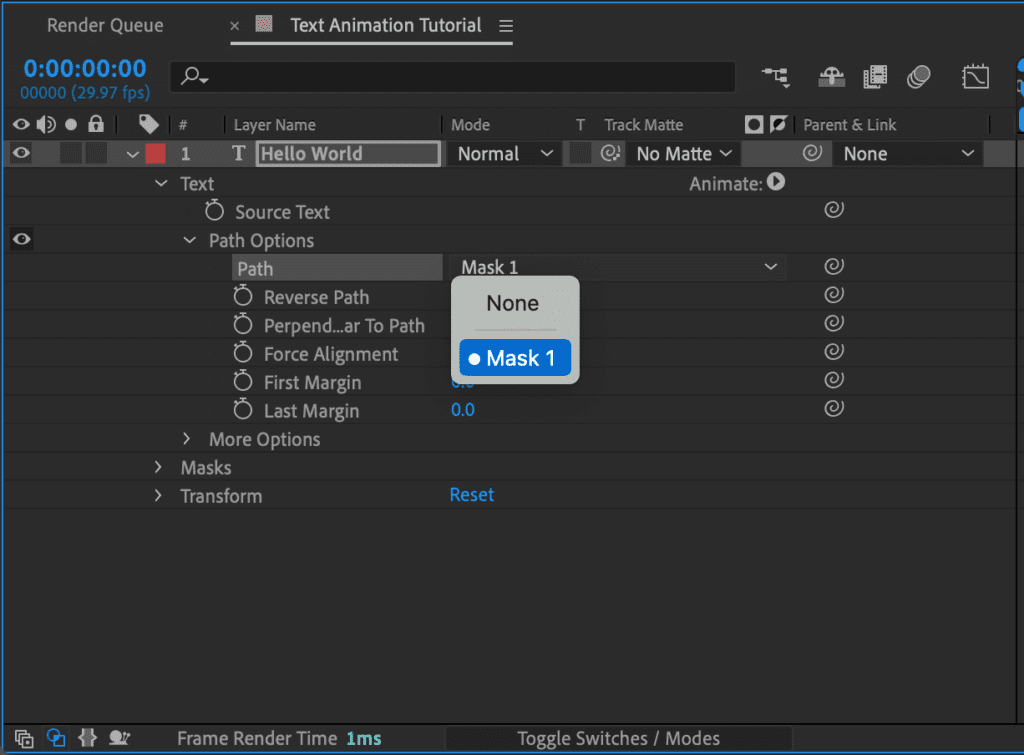
4. Update frames
Set a Keyframe for First Margin at frame 0. You can lower the value to what suits your Path. When you get to frame 30, change the First Margin value to 0 and apply Easy Ease to the frame.
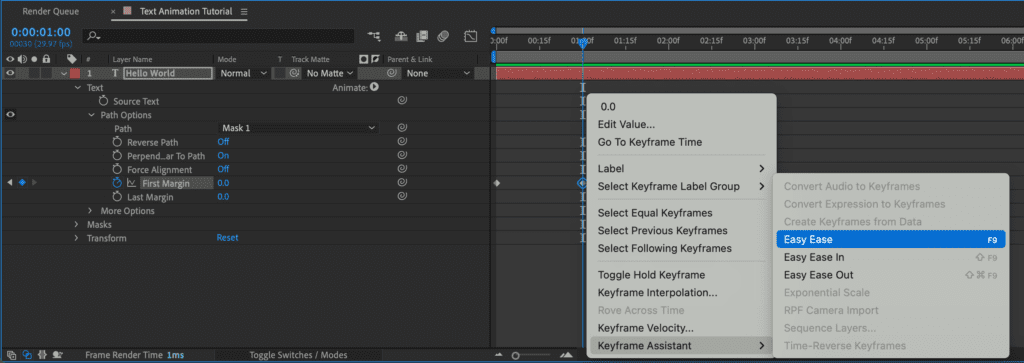
Next, move to Frame 45, add another Keyframe of similar value and apply Easy Ease as well.
Finally, move to frame 75 and choose a high number for the First Margin value to animate it off the screen.

Using presets for text animation
This is considered one of the easiest ways to create animated texts using After Effects. Packed within the After Effects program, are numerous animation presets you can try out to discover the possibilities of text animation. Another benefit of using presets is saving time as they come ready to use. There are free and paid preset options.
Browse and apply the text animation presets under the menu panel ‘Effects and Presets’ or Adobe Bridge.

To apply, drag and drop the preferred animation or double click on the preset if a layer is selected. Any of these actions will automatically apply to the preset. Afterward, you can make adjustments like changing the speed of the animation by dragging the Keyframes whichever way you desire.
Explore text animation templates for After Effects
Text animation is just one of the effects you can create within After Effects to set your videos and projects apart. Explore more of our After Effects tutorials here to learn even more tips and tricks for getting the most out of your favorite video editor. If you’re looking for an easier way to add animated text into your projects, explore our selection of text templates to use with After Effects. All of our templates can easily be downloaded and completely customizable. AE templates are easy to use and require minimal technical skills to edit.
With a Storyblocks subscription, you get built-in access to all of our content, plus our plugin that brings 2 million stock assets right into After Effects. Our library of over 2 million assets includes high-quality royalty free stock videos, templates, images, and audio. So you not only get AE templates to create advanced animated text effects, you also get other tools to edit and enhance your video content. Our plans are built to fit your budget through affordable subscription packages with licensing that covers both individual creators and businesses of any size.


